- 2.0.0
- 1.3.3
Quickstart
You don't want to spend time to read all the documentation of ImageWorkshop (you'll read it later if you have special needs...), ok, so let's see a quick overview of ImageWorkshop that will teach you the basics of the class !
First, install ImageWorkshop in your project, and then lets play with the class !
A layer will contains the image you want to work with. Here we initialize a layer from a physical image on the server:
$pinguLayer = ImageWorkshop::initFromPath(__DIR__.'/../path/to/images/pingu.jpg');
The layer will have the width and the height of this image. At every moment, you can get the width and the height (in pixel) of a layer thanks to these methods:
        echo $pinguLayer->getWidth();
        echo $pinguLayer->getHeight();
In our example, we suppose that Pingu picture dimensions are 640px for 480px in our example:

You can see all the methods to initialize a layer (from an upload form, a PHP var...) at the initialization chapter.
Then, you are able to apply an action, like a resize, on this layer:
$pinguLayer->resizeInPixel(400, null, true);
Here I choose to resize the layer to have a width of 400px, and also to auto-resize the height to conserve proportions.
There are many actions (rotate, crop...), learn them at the actions chapter.
Here what the layer seems after the resize:

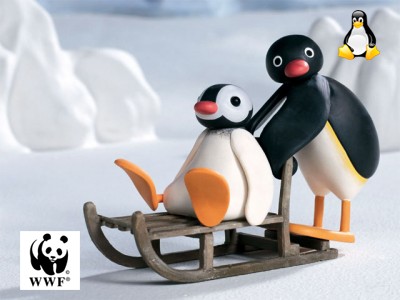
ImageWorkshop allows you to superimpose plural layers on the top of each other: every layer has a stack of sublayers on its top, empty by default.
We want to add 2 images on the top of our pingu, to start we initialize 2 other layers:
        $wwfLogoLayer = ImageWorkshop::initFromPath(__DIR__.'/../path/to/images/wwf.png');
        $tuxLayer = ImageWorkshop::initFromPath(__DIR__.'/../path/to/images/tux.png');
Then we add them on the stack of the pingu layer (understand on the top of this layer):
        $pinguLayer->addLayerOnTop($wwfLogoLayer, 20, 10, 'LB');
        $pinguLayer->addLayerOnTop($tuxLayer, 20, 10, 'RT');
You can place the layers at the position you want on pingu layer:
- $wwfLogoLayer is placed at the left bottom position on the top of pingu layer thanks to the 4rth parameter, with the string value 'LB' to say "Left Bottom". Also, it has a translation of 20px from the left and 10px from the bottom of pingu layer !
- $tuxLayer is placed at the Right Top ('RT') position on the pingu layer, with a translation of 20px from the right and 10px from the top.
You can see all the possible positions to place layers thanks to the Corners / positions schema of an image.
And you can also learn more about superimposition, which is very similar with Photoshop principle !
Here what the layer seems after we added the 2 logo layers in its stack:
Finally, we choose to save our modified layer (in a folder):
        // Saving the result
        $dirPath = __DIR__."/../web/uploads/2012";
        $filename = "pingu_edited.png";
        $createFolders = true;
        $backgroundColor = null; // transparent, only for PNG (otherwise it will be white if set null)
        $imageQuality = 95; // useless for GIF, usefull for PNG and JPEG (0 to 100%)

        $pinguLayer->save($dirPath, $filename, $createFolders, $backgroundColor, $imageQuality);
We choose to save the image as a PNG, even the original was a JPEG, by specifying the extension in the filename.
If the folders don't exist, not a problem: by setting the third parameter true, ImageWorkshop will create them for you !
Of course, you can also show the result in the navigator, or get the image variable to work without ImageWorkshop, see here to manage the result.
Here the final code of our guided tour in one small snippet:
        // Initialization of layers you need
        $pinguLayer = ImageWorkshop::initFromPath(__DIR__.'/../path/to/images/pingu.jpg');
        $wwfLogoLayer = ImageWorkshop::initFromPath(__DIR__.'/../path/to/images/wwf.png')
        $tuxLayer = ImageWorkshop::initFromPath(__DIR__.'/../path/to/images/tux.png');

        // resize pingu layer
        $pinguLayer->resizeInPixel(400, null, true);

        // Add 2 layers on pingu layer
        $pinguLayer->addLayerOnTop($wwfLogoLayer, 20, 10, 'LB');
        $pinguLayer->addLayerOnTop($tuxLayer, 20, 10, 'RT');

        // Saving the result in a folder
        $pinguLayer->save(__DIR__."/../web/uploads/2012", "pingu_edited.png", true, null, 95);
ImageWorkshop is really intuitive and simple to use, despite its high flexibility !
To finish, I invite you to read an important chapter of good pratices to avoid some bugs.
Now, you are able to play with the class !